Welcome! In this blog post, I'll be taking you through step-by-step instructions of how to edit realistic snow into your pictures. The photo I will be using has been taken, and edited entirely by me. The model is @briarrosecosplay (IG).
You will need to find and download a snowflake brush, and load it into your Photoshop to create the flakes, this is very easy to do and the internet can help you with whatever version of Photoshop you have!
How To load Photoshop brushes: https://designshack.net/articles/software/how-to-install-use-a-photoshop-brush/

As ever with realism, it's important to constantly think back to the real life nature of physics and the medium you're applying to it - in this case snow. We want to mimic the way that snow falls and light works with it but captured in a still image! Remembering details such as 'snow further away would be more blurred' or 'Snow in front of a white background would barely show up' are key to making your pictures look as realistic as possible.
This post includes:
1. An Overview (For Photoshop Pros): This is for those who don't want or need the super detailed explanation and just want to see what values and filters are applied to each layer.
2. A Step-by-step tutorial with detailed picture guides to help you along the way and points to consider when using this effect on your own photos!
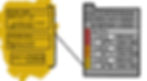
An Overview (For Photoshop Pros):
Here are all the filters applied to each layer of the Snow Effect, for those people who don't need all the extra information!


A Step-By-Step Tutorial:
Open your image into Photoshop. I would recommend you do your initial editing and colour grading before this step, although as the snow layers will be separate from your base image, it is not required.

Open a New layer, and rename it 'Snow - Large'
a) Select your Snowflake Brush. Make sure that the brush colour is set to white. (A snow brush can be a brush with a slight variety of blob shapes that are not entirely circular! You can find similar ones online easily)

b) Set the brush size to the size you’d like the snow that will appear closest to your model/the camera. Scatter them around the photo (don’t worry too much about placing for now, just space them around the photo.) (I rarely put more then one or two flakes on the model or it looks too much but you can fix this when you layer mask)

c) Apply a motion blur to the "Snow - Large" layer [Filter/Blur/Motion Blur]. I used Angle: 77° // Distance 27 pixels with the angle slightly to the right (Alternating this angle helps add the 'swirling' effect to the snow. (These settings should change slightly according to your photo.)


d) Apply a Gaussian Blur to the "Snow - Large" layer [Filter/Blur/Gaussian Blur]. I set the radius of mine to 4.5 pixels. (These settings should change slightly according to your photo.)

e) Change the opacity of the "Snow - Large" layer. I set mine to 58%.

f) Open a layer mask to start blending the snow to your liking. It’s worth noting here that on very bright or very dark areas, snow wouldn’t really show up as much so the snow can be much lighter on those places. Also think about how some snow is closer to the camera so would be clearer. I use a graphics tablet with pressure control but if you don't have one you can use a brush on about 50-70% and layer up the brush strokes to control how the snow turns out. Using a layer mask means you can remove, and bring back the snow without actually erasing it so it’s non-destructive (e.g. if you paint black on the mask to remove some of the opacity, if you paint in white over the same area it will bring back the image even if you couldn’t see it).


g) Light Source! Remember your light source will affect how the snow looks. The snow nearer the lightsaber in this image should be brighter and even the edges of the snowflakes nearest to the blade should be brighter than the edges further away. I used the layer mask to do this, but you could also 'dodge' the edges of the snow closest to the blade/light source.

h) As the snow is white and can stand out a little too much, it's best to use a 'photo filter' adjustment layer to help it blend into the photo. Here my image tones are very blue, so I've used a cooling filter to make the snow blend in. To make the photo filter apply to only the layer with the snow, place the 'photo filter' layer directly above the "Snow - Large" layer, hold down alt and click on the line in between the layers. This applies the filter ONLY to the snow layer and won't affect the colour toning on the rest of your image. (When using this adjustment of something white, uncheck the 'preserve luminosity' box or the snow will not be affected by the filter.

2. Make a new layer and rename it "Snow - Medium".

a) Here you will repeat the same steps as above but adjust the brush size to be slightly smaller to make the snow look farther away. This is your 'middle distance' of snow. There should be slightly more of the snow around when you scatter it too (again this can be changed with the layer mask later.

b) Add Motion Blur at at slightly different angle to make the snow in the image look more dynamic, as if it is swirling gently down and around. I used: Angle: 74° and a distance of 26 pixels. I put the angle slightly to the left as well.

c) Add Gaussian Blur to the layer. I set mine to: 8.4 pixels here. As it is 'further away' from the camera it should be less distinct, (but also as it is smaller the blur will take effect much more quickly).

d) Add a Layer Mask again and mask out the snow you don't/do want and blend it in with the low opacity brush. Again change the image opacity down (Mine to 36%) to blend it in.

e) Duplicate the photo filter layer you used before and apply the copy to the "Snow - Medium" layer in the same way, by holding alt and clicking.

3. Make a New Layer and rename it "Snow - Small". Repeat all the above steps, but have much more small snow filling in the background to make the image look more 3D. Remember don't worry if you initially add too much snow as you can layer mask it out


a) Apply Motion Blur to the layer, with another slight angle to complete the swirling effect. I used: Angle: 62° and Distance: 20 pixels.

b) Apply a Gaussian Blur to the small layer, I used 8 pixels here and change the layer opacity down. I used 40% c) Use a Layer Mask to blend in the small snow to the background, paying attention to where it wouldn't show up in real life e.g. against a very white/light area of light source or sky. d) Use the same Photo Filter and apply it the the small layer (alt and click)

4. Group all the layers together by clicking on the first of the layers, and the last of the snow layers (and their adjustment filters) and press Ctrl+G. You can then rename the Group "Snow" so they are all in one place and you can edit the original image without having to worry about disturbing the snow. You can also apply a layer mask to the group layer and adjust ALL the snow layers from there by using a brush to take away, and bring back the snow parts.


5. Voila! You should now (with a few tweaks to your own photos) be able to add some pretty realistic snow into any picture you need to!


Feel free to send me your finished photos on Instagram (@charlottewoolrych_photography) so I can shout you out and share your work on my stories, and please do give me any feedback on the tutorials so I can improve!
Enjoy creating! Charlotte xxx